PROJECT OBJECTIVE:
Replace the AVR processor on the Arduino form factor with a 28 pin
18F PIC processor. Add both an EEPROM and RTC to the design. Use thru
hole, including DIP parts, to facilitate assemble.
FEATURES:
- 18F, 28 pin PIC processor (16F optional)
- Tiny bootloader with auto-bootloading (DS30 coming)
- Arduino pcb form factor
- Serial communication using breakout boards
- Stackable connectors with Arduino compatible pinout
- Dual LDO regulators for 3.3V and 5V.
- Power switch, 300ma
- Jumper for comm port power
- Onboard I2C RTC and EEPROM
- ICSP connector at front
- Reset switch accessible at front
- Testing LED on B0 at front
INTRODUCTION:
Initially, the18F2520 will be used since there is an available Tiny
bootloader that we have been using with good results. Presently, we are testing the 18F25K22 with the DS30 bootloader.
This design uses
the Arduino physical stacking connectors, without change, except for
some signal assignments. The USB circuit which is incorporated on the
Arduino has not been incorporated on the Picduino, but will be
contained on a breakout board allowing both RS232 and USB serial
communication. The RS232 breakout will be available with the initial
project and for USB communication the Sparkfun DEV 09716 will be used. This will provide the same USB functionality as the Arduino
with the exception of powering the Picduino from the USB port.
The 18F2520,
18F25K22 and 18F25K20 use 5V and 3.3V respectively; therefore, dual
LDO regulators have been provided. Dual regulators, also seem
reasonable, since there may be shields requiring both voltages. A
switch is used to apply power to the board.
Since the intended
use for the Picduino is as a base unit for the Rainwater Level
Monitor project, an RTC and EEPROM were incorporated on the main Picduino PCB. Because the
Picduino can operate at 3.3V the RTC, DS1307 can't be used and has
been replaced by the PCF8563 in the design
For software
development, several compilers can be used including: OS Basic,
MikroBasic Pro, Swordfish and Proton. If you use the 18F25K20 or 18F25K22, then
the free Amicus compiler can be used. With the latest updates, PicKit2 will program the
18F25K22, see Tips and Tricks. The18F25K22 is also supported by
MPLAB.
The “C”
compiler used by Arduino can create compiled modules and then linked
from libraries using an Include directive. Both MBP and SF can do
this, but PicBasic Pro, Proton Basic, OS Basic and Amicus can't.
This feature of the AVR-GCC compiler is one of the reasons that the
AVR processor was picked for Arduino and why the Arduino platform is
so successful. Our intention is to develop code with Swordfish and OS Basic.
As an aside, the
method of Arduino development is similar to our method described in
this site. Compile the code, download it, examine its behavior, then
make adjustments to the code and try again. There are code developers
out there who use the AVR-GCC to create modules that the uninitiated
can use. Most of the hard work is done by those developers. For
example, writing code to generate the model train DCC signal is not
simple because of the timings involved, but I am sure some developer
is out there building a DCC module.
Note 1: The
Arduino uses DTR of RS232 to reset the processor for an autoboot. The
FTDI cable brings out RTS on pin 6 not DTR so it will not work in
autoboot mode. Sparkfun sells a USB breakout board that will work
(DEV-09716).
DIMENSIONS:
W: 2.7 in, L: 1.9
in, H: .5 in
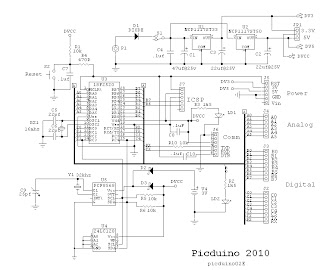
SCHEMATIC DIAGRAM:
PICTURE:
BILL of MATERIALS:
PCB LAYOUT:


Hi where can i buy a "Picduino". I need to program it whit Flowcode language.
ReplyDeleteThanks
J
You can get the pcb from Batchpcb. $15. will get you two boards. https://www.batchpcb.com/pcbs/39985. Let me know if you ordered it and I will take time to add the BOM above.
DeleteNicely done. Clean, good looking design. I considered the Arduino form factor but decided against it for a couple of reasons:
ReplyDelete1) enclosures are not cheap nor plentiful
2) part of the 'power' of the platform is the 'shield' concept, but
that power comes more from the pre-written drivers (IMHO).
3) I wanted more ports than the basic Arduino, but not so many
as their higher end board.
Also, I'm a hacker, so I decided to wing my own design.
http://woodworkerbcncrouterproject.blogspot.com/
Keep on sharing!
Hi,
ReplyDeletelooking in the photo picture, may be the RX / TX pins are swaped in the white silk. Also, in Arduino the RX pin is in the first position P0, not in the P7 position, so the J2 pins may be all swaped. The other digital J3 pins (B0..B7) should only have 6 pins like Arduino, not 8.
Look at a comparision of differents PICduinos (in spanish) at http://sites.google.com/site/freesensors/controladores/picduino-fs
Yes, this design needs updates. At the time was interested in the Amicus 18, but decided Arduino C compiler with true libraries made more sense so haven't continued with this design.
Deletehttp://www.click-server.com/MyAmicus_Compiler_Docs/Amicus18%20Hardware%20Manual%20-%20Revision%201.pdf